01/06/2017

Quilting Bee de juin : l’aventure galactique dont vous êtes le héros !

Pour ce mois de juin, je vous propose de prendre un peu les rênes du bloc. La figure imposée est celle du « drunkhard’s path » sur fond noir. Le reste, c’est vous qui en décidez.

L’inspiration de base, ce sont ces blocs que j’avais fait il y a quelques années de ça pour m’entraîner à réaliser des arrondis. J’ai trouvé que le résultat faisait penser à des corps célestes. Donc ce mois-ci, nous partons dans l’espace !


Il s’agit d’assembler 4 carrés de 4.5’ de côté. Cela donnera un bloc de 8.5’ de côté.
Chaque carré comporte un arrondi.

Cet arrondi, c’est vous qui décidez de son rayon !
Je vous propose deux exemples : un avec la taille maximale, qui vous permet de réaliser 3 blocs différents ; un autre avec un rayon plus petit, plus le tracé pour réaliser un bloc « éclipse » avec ce rayon.


On commence par tracer deux carrés de 4’ de côté.
Puis à l’aide d’un compas (si vous n’en avez pas, une ficelle accrochée à un crayon fait l’affaire), on trace l’arc de cercle, identique sur les deux carrés.
Puis finalement on ajoute les marges de couture de ¼’.
On a donc une partie concave, et une partie convexe.

Pour un grand arrondi :


Pour un petit arrondi :


Pour permettre de tracer le supplément « éclipse » pour le petit rayon, on trace à nouveau deux carrés de 4’ de côté. Puis on fait des marques qui correspondent au rayon (dans le cas de mon exemple, c’est 2’1/4), et on trace à nouveau deux arcs de cercle, mais depuis l’intérieur du carré. Et on finit par ajouter les marges. Là aussi une partie concave, et une partie convexe.


Pour obtenir le bloc 1, couper :
4 x A couleur
4 x B noir

Pour obtenir le bloc 2, couper :
4 x A noir
4 x B couleur

Pour obtenir le bloc 3, couper :
3 x A couleur
3 x B noir
1 x A noir
1 x B couleur

Pour obtenir le bloc 4, couper :
4 x C couleur
4 x 5 noir

Pour obtenir le bloc 5, couper :
3 x C couleur
3 x D noir
1 x C’ couleur
1 x D’ noir

Pour les blocs 1 et 2, en optimisant, vous aurez besoin environ de 5’x18’ pour le A, et 5’x12’ pour le B. Et pour le bloc 4, 3’1/2x12’ pour le C et 5’x16’ pour le D.

Le fond doit être noir (le vide intersidéral, tout ça), mais vous avez carte blanche pour la couleur. Choisissez un tissu que vous aimez, qui vous correspond, bref, réalisez un astre qui vous ressemble !

A présent, je vous donne ma méthode pour l’assemblage. Si la couture des arrondis n’a pas de secret pour vous, vous pouvez passer sans problème (et zou, au travail !).
J’utilise une technique un peu chronophage utilisée dans la couture de vêtements, mais qui a prouvé son efficacité.

Je commence par faire une piqûre de soutien à un poil moins qu’1/4’ sur la partie concave (puisque ma marge de couture est d'1/4').
Puis je crante. (environ tous les 5 à 7 mm)
Je marque les milieux de mes pièces concave et convexe à assembler, et j’épingle aux deux bouts et au milieu.
Et enfin je couds à ¼’. (Je le fais avec la partie concave dessus pour pouvoir mieux la manipuler.)


Je trouve un double avantage à cette technique : la piqûre de soutien empêche que la partie convexe, coupée en biais, ne se déforme démesurément ; et elle donne un résultat plus régulier et sans petits plis.


Et donc, une fois vos 4 carrés à arrondis réalisés, vous n’avez plus qu’à les assembler pour former le bloc.


Bon courage à toutes, les abeilles de l'espace !

To infinity, and beyond !

Et voici les blocs reçus :


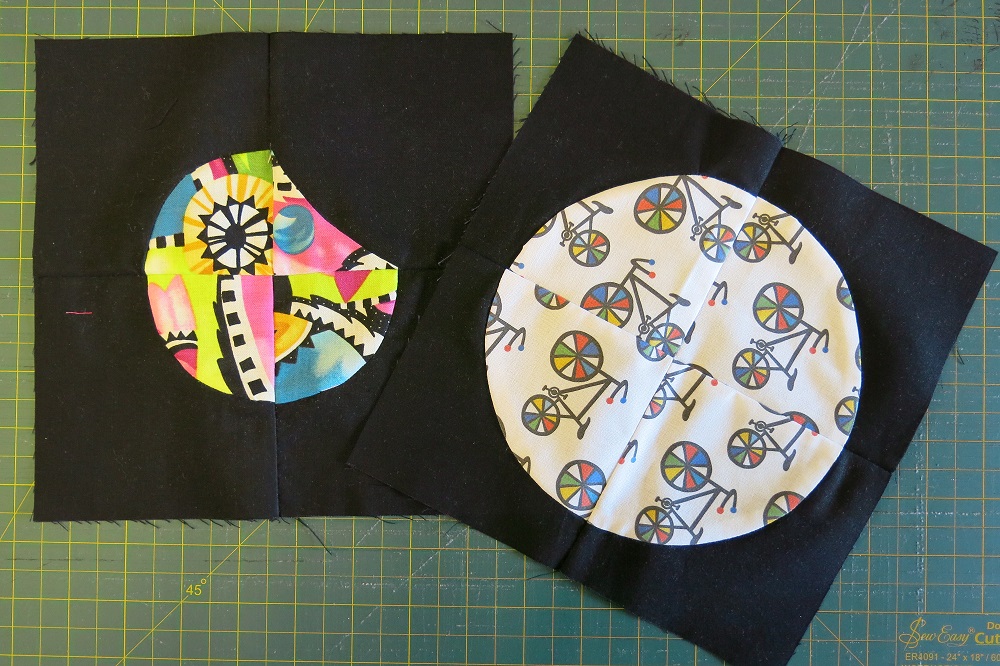
(une fois encore, pardon pour la qualité des photos, il fait toujours gris quand ça arrive...)

12/04/2015

Marsala, 2015 Pantone Quilt Challenge : Invasion.

It all started on Play Crafts' blog, a long time ago (okay, two months). A challenge. A REAL challenge. A color nobody likes. Some joke by Pantone (something along "let's see if people are sheeps and suddenly love a color because we said so"). A double challenge : make a quilt in a strange color nobody has in their stash and nobody's selling.

Believe it or not, I had some of it in my small stash. Some remnants from another life.
(as a side note, I would like to say that I just had to buy the zipper, everything else I already had in my stash !)

So, first, find the right color association. I hesitated between blue and green. Green was a bit "sad", so I choose blue.


(achtung ! overexposed photo and unrealistic colors)

Then the design. Having only scraps, I opted for a 40x40cm (15.74"x15.74") cushion cover.


(beautiful example of humanity 2.0 -I've heard that right now it is humanity 3.0-)

I think I spent two weeks drafting and re-drafting this one. (yes, I need a real size pattern, my brain can't manage small scale). I thought about paper piecing, improv, and everything in between. In the end, it's a bit of everything. I "improv'ed" the stripes, appliqued the hexies, and paper-pieced the complex ones. (note : I never ever paper pieced before)


On my drawing, the stripes and the hexies are aligned. In real life, I thought it was a bit flat and lacked depth, so I rotated a bit my stripes (I couldn't do it more than this, as my square of stripes was not very large).

And thus was born "Invasion" :


I quilted the stripes, first in the ditch, and then perpendicular, with "invisible" thread (what you see is actually the sun reflected in the plastic). I'd like to say I opted for geometrical quilting for general coherence, but the truth is that my sewing machine still refuses to make nice stitches in FMQ.
I then appliqued the hexies and quilted at 1mm of the edge. (sorry, RTW seamstress habit)


I apologize for the colors. The weather has been strange/aweful/too sunny alternatively for a month, and it has been hard to calibrate my camera with the difference between red and blue. (in reality the colors are much duller, and the "marsala" is almost perfect)

30/08/2014

Funky forest cross-stitch


Well, I've been away from my sewing machine for one month (hard, I know), but I didn't keep my hands idle. 
I brought with me a project I've had for a long time now (well, a little more than a year, but still...).

Satsuma Street's Forest cross-stitch pattern.


Yep, it's a lot of colors.
Each year DMC has a special offer : 3 bought, one offered. And given there's at least 20 colors in this, it was welcome.

The canvas is a 10 count (25 for people across the Atlantic) cotton evenweave.
I used 3 strands over 2.
The end result is about 13cm x 38cm. (5.12x14.9)
The threads around it mark the size at which it will be framed. (23cm x 48cm) Unfortunately I left it at my parents so I won't be able to make a good photo of it before long.
It took me the better part of three weeks, stitching about an hour or two day. (under the watchful eye of my grand-mother)

The pattern was very good and easy to read, given the number of colors.
I just regret there hadn't been a black&white version of it, as I can't print in color. (and had to lighten it so it was not just a big dark grey blot).

Satsuma Street is best known for their city inspired cross-stitch patterns. The reason I didn't do one (yet) is because I can't seem to choose. (and it's so much work I don't think I would want to gift it)

Maybe Tokyo... (souvenirs, souvenirs)


19/07/2014

ACorny Quilt, off season.

I began thinking about this design about a year ago.
I wanted something simple, straight to the point.

I didn't feel like piecing the acorns, so I decided to make them in appliqué.
I "glued" them on the top and quilted them directly. (lazy ?)

I made a lot of tests to find the right proportions for the acorns. I even asked my friends which one they prefered. (they don't even bat a lash anymore)


The motif you saw in a previous post on FMQ is actually the one I used all over the quilt.
I decided to add the "arcs" to give motion and break the monotony. (And I thought it was funny, it told a bit of a story there). (My friend Mercredy calls it the squirrel quilt).
It went fairly quickly. Well, once I recognized that my machine was not made for FMQ, and that I would have to look at it from afar.


110 cm x 140 cm. (44"x55").
FreeSpirit solids.
Guttermann thread.
Backing is brown and binding is evergreen.
Polyester batting.

12/07/2014

Trousers compulsion.


I need trousers.
I hate shopping for trousers. (you know, this feeling of despair, after you've tried 40 different trousers and nothing fit ?)
So why not make them ?
Because finding a pattern both flattering and modern is difficult.
Because fitting trousers is hell.
Despair or hell ? And why not wear skirts ?
Well, hell it is.

I choose Burda 7250.


The pleats are flattering, the shape is what I would wear (it I could find a good pair in store), and it has good reviews on internet.
I made a first pair as a wearable muslin. I didn't take photos. I followed Burda sizing, and of course, they're too big.
So I made a second wearable muslin, one size down. (hmmm, this sensation when you're destashing). (I lacked fabric, so I didn't cut in the grainline)


The fit is better. It's a bit tight at the hips -nothing uncomfortable but it pulls the pockets open-, and at the knees -it's difficult to bend my legs-.
And I think the trousers are a bit short.
What the photos don't show is bagginess at the seat.

I had two solutions, for a flat butt adjustment :
- fish eye dart (as seen here)
- or simple dart (as seen there).

So, after a FBA and slight widening of the legs, I pulled my bazin fabric out and cut.
(yep, there's an african theme here).

Details of the design.


It fits ok. (I never wished for perfect or even great).
The problem at the hips overshadowed the slight gaping at the waist. (bah, belt).


And now, some truth tea : the reason that all the photos of these trousers have people with hands in the pockets, and feet in high heels is shown on the photo bellow :

Not that flattering. 
But I like them nonetheless.

So much so that I made a third (fourth) in a wax I bought compulsively. (wax in violet and water green, yay !) For later when I can make photos.

Ps : do not wash your bazin at more than 30°C. It's tempting, but no.