Affichage des articles dont le libellé est pattern. Afficher tous les articles

31/08/2013

Flowery shorts - A Ralph Pink Pattern

Ok. I know what I said about downloadable patterns. But I followed the chart, and the obvious conclusion is just below. 

The pitch :
"The shorts are utterly cute, and the belt detail just adds that extra definition to the waist, complimenting your feminine shape. These would be great in a soft fluid fabric or even a tough leather, play on the use of fabric to create some classic staple pieces for your wardrobe. Even customise them with some studs to be bang on trend."

Ralph Pink is a gentleman (he's a brit) : "complimenting your feminine shape" ; translation : "accentuating your waist and camouflaging your plump behind". 

As you can see, I'm not "bang on trend". (the way I see it, I'm never out of trend either) Nothing fancy. Just good old twill.

What convinced me : the pockets, the folds, the length.


So, what's in a Ralph Pink Pattern ?
+ It's fool proof (poka-yoke we'd say in a manufactory). Calibration, print instructions, instructions, seam allowances, pieces to interface, everything is written.
+ Super detailed instructions. In pictures. (see example below)
+ Average sizes available.
- A mistake in the instructions. 
- Too much ease, maybe.
I've read recently that RP Patterns were purchased in a single size (the one chosen). Mine came in sizes from 8 to 16.

The mistake is in the "interior belt" construction ; it's more like a traditional belt part, whereas the pattern has no showing belt (just a facing). This also changes a bit the way of inserting the zipper.

The only modifications : I narrowed it at the waist and I added belt loops. (it needed belt loops).




25/11/2012

Elementary ! My Watson Jacket !

A few months ago, in my explorative quest of independent patterns designers, I bought the pattern for the Watson jacket, by New Zealand based Papercut Patterns company, attracted by the simple chic of the design.

I've waited a long time to find the right fabric. And it was worth the wait.
This summer, during a business travel, I came across what could be the most well kept secret in the world of fabric shops. In Quimper (Brittany, France), in a shop no larger than a parking lot, you can find haute couture fabrics, recovered from the parisian workshops at the end of a collection, and others bought from the same factories as the designers. The owner has customers from Russia, Japan, China, ..., and can talk to you about "his" fabrics for hours on end. The ransom for this, however, is that he can't advertise his shop, so the only way to know of his shop is word of mouth or a lucky strike. The fabrics, however, are not cheap. I feel a bit ashamed of the amount I put in just a meter of fabric, but seeing the result, I'm quite happy with this impulsive purchase (well, it was love at first sight, really). The prices range form 40€ (for simple cotton, or wool), to nearly 200€ (for digitally printed Galliano silk) for a meter of fabric.

But now, on to the jacket !


If you have already made a lined jacket, it's not really difficult to sew, depending on the fabric you use. But I would not recommend it if you have heavy adjustments to make, as you'll have to take the cape in consideration.
Sometimes the explanations were a bit cryptic, but overall, the step by step is easy to follow ; it just lacked a few notches for a bit more precision in sewing, in my opinion.

I didn't have enough buttons to cover, but didn't know this until I made all of them, and had to use the test one ; I sewed it under the collar, where it never shows...


I found this lining to be perfect, golden with a blue glint.
As the cape fabric is very lightweight and prone to slackening, I topstitched at 5mm the bottom of the cape.


The fold at the back of the cape gives a welcome ease, and the design of the bottom back brings further originality.

I'm very pleased with this pattern. The result is perfectly true to the photo on the envelope.
It's very flattering, and I never received so much praise for a garment I made.

ps : if you hadn't guessed, the "couture" fabric is the tartan one.

28/10/2012

Children Circus Tent vintage sewing tutorial

Here's a tutorial from a 50's Mode&Travaux Magazine from my grandmother's collection (she had a subscription in the 50's).


"The circus tent...

... will enchant children and parents alike, because it will permit to tidy up all the little toys lying around.
It's made of oilcloth in two or three colors (total meterage 1m20 x 1m50). Red and white, red and blue, green, red and white are cheerful combinations.

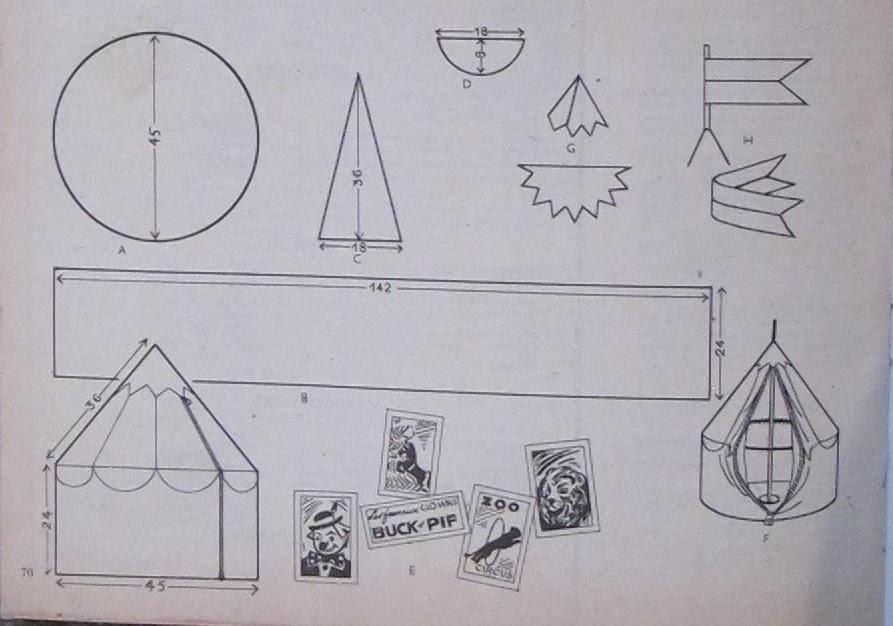
It's made of four parts :
- The bottom - A - is a circle
- The body - B - is a rectangle
- The marquee - C - is made of 8 triangles (in two colors)
- The canopy - D - is made of 8 scallops (in two colors)

The tent is reinforced by a disk of wood nailed to the bottom, and a sturdy pole screwed on this disk. This mount is simple to tinker, provided to give the disk to the carpenter to make it.
The assembly of the tent frame is made with a circle of wire (from the carcass of a lampshade for example), or wicker.
The tent opens with a 59cm zipper.

Trace the pattern with a chalk on the wrong side of the oilcholth, and cut, adding seams allowances.
On the "body" of the tent, "B", sew "posters", "E", from a contrasting color, and paint clowns or write fabulous programs. Let dry.

With a sewing machine, wrong side on wrong side, sew :
1- Bottom and body ; do not close ;
2- The 8 parts of the marquee, following the marking, let open ;
3- The canopy, put it on the "body" ;
4- Sew together marquee and body ;
5- Screw the pole on the wood disk, put in place, nail the bottom on this "carcass".

Overlock the wire inside the tent, where the body and the marquee are joined, "F". Close the "body", put the zipper on to close the tent. Set the top of the marquee around the pole with a few nails.
Sew a cone of oilcloth at the top to hide the finishings, "G". Make a banner in oilcloth (two-faced), and stick it at the top of the pole.


I tried to stay faithful to the original text, because I really love all those charming obsolete details (the carpenter !).
The tent is really small, but it can be made larger and become a real tent. (at first I thought it was, and was a bit disappointed when I read the measurements).

12/09/2012

Downloadable sewing pattern flowchart

Recently, prominent sewing bloggers (Gertie, Male pattern boldness, ...) have raised concerns about this new trend with sewing pattern companies : the downloadable pattern.
They mainly express their frustration, and I quite agree with them, having tested the thing already (3 times, maybe 4, if I'm brave enough).

So, compiling my experience and their remarks, I've made a flowchart to help myself (and others, like you, maybe) make the right decision.

(yes, it's beautifuly made with Paint, as I've got no computer or design talent) (start is at top right)


04/08/2012

Colette Violet & Burda Skirt

One year ago I thrifted two pieces of silk (a yellow one, and a grey with small yellow flowers one), but there weren't enough to make a garment from them, so I began searching for a pattern where I could combine both (without it looking too weird), and finally I opted for Violet, from Colette Patterns.

For the yellow fabric I had two challenges : a small hole right in the middle of the piece, and not enough fabric.
I reduced the sewing allowances to 1cm (about 3/8") (and 2cm at the bottom), modified a bit the sleeves to add the grey sleevebands, and removed the facings. For the closure, I made a very narrow overlap (2cm), thus needing to make vertical buttonholes. And finally I sewed the collar using the bias method.


As I didn't want to take the risk to ruin my fabric, for the collar, I choose not to use fusible interfacing, and instead just sewed a lightweight cotton interlining.
I also choose to remove the facing because I feared it would appear too much through the fabric. (and it's the case with the overlap part, it's really darker)
I used small round frosted glass buttons, thrifted a few years ago. On the yellow fabric, they seem to be nearly the same grey as the collar and sleeves parts. After the first washing, the buttonholes loosened, so, in order to stay seemly, I had to close them a bit.
As always, this Colette pattern was a pleasure to make, and I'm really happy with the result.


The skirt is a pattern from Burda Magazine, the #106 from 05/2012.
The fabric is a stretch cotton gabardine.
It was really easy to make, and the result is very gratifying. This skirt is incredibly confortable, and very stylish.
The only difficulty was trying to understand the instructions for the overlap part (with its hidden buttonholes). In the end it was not that complicated, but well, I'm not yet fluent in Burda language.
Here it seems there is extreme crinkling, but it's only shadows, and in reality it's much more acceptable.

29/07/2012

Why I don't sew japanese

In France, for a few years, the trend has been to "sew japanese", understand, to sew using patterns from the books published in Japan and written by japanese people.

I've always been fascinated by those, browsing through them for hours at the bookshop ; but I only own 3.

I perfectly understand their appeal, having succumbed to it thrice.
They're exotic ; yes, they have this kind of feeling : they come from far away, you can't really understand what's written, it's nearly underground ; in short, they're hype.
The photos make you think you're not making a garment to wear, but that you're sewing fashion ; it's not the usual Big4 corny/clinical photos. The fabrics are trendy, the girls are cute, the photos look like good blog photos, often with an aery, relaxing feeling.  (a sort of  "slightly better than you girl next door")


As for the patterns themselves, they're quite simple to make, allowing anybody (beginning with the beginner) to sew them. The absolute strong point being the instructions. Forget Burda and their too-long-or-too-short-cryptic-translated-from-german-via-hungarian explanations ! Real "step by step" !


So, why did I choose not to "sew japanese" ?
It's not so much a choice than lazyness.

Firstly, these patterns are often provided in three sizes, S, M and L. Their L being far from the L I wear normally. And then there's morphology ; I'm taller than their norm, and I'm an hourglass, while japanese girls are mostly small rectangles. Conclusion to this : I have too many modifications to make before I can put on anything I've made using these patterns, without looking pregnant or like I'm wearing my teenage cousin clothes.

The last reason is just a snobbish one. These patterns are just too simplistic. It feels like sewing rectangles together in every possible way. The finishes parts are often chosen for their easiness, and are not always the most appropriate (you often have to adapt to the fabric).

My arguments seem antithetical : they're not challenging enough, but adapt them would be a real challenge.
But would you pay for patterns you have to modify so much (and loose so much time on) that it would be easier to create them from a block ?


** this is just the way it works for me ; I don't criticize people sewing from these patterns, some wonderful things have been sewn from them**