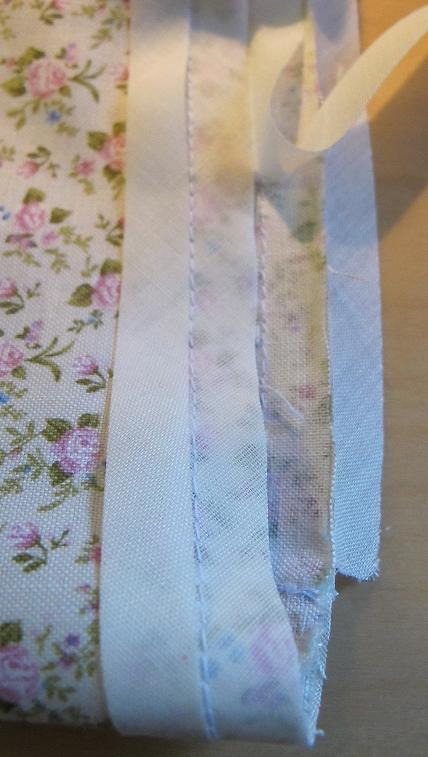
Dissatisfied by the look of my collar and cuff points, I searched for an easy way to achieve pointy points.
My "technique" was inspired by this tutorial from Off The Cuff blog.
I tried a few times, but each time the thread "escaped".
So here is what I'm doing now ; once my collar/cuff is sewn and the angle cut, before turning it, I put a pin just at the angle, between the two layers, then turn it inside out (careful with the fingers), and pull on the pin. The head is caught by the seam, but it's so tiny that it "pushes" well into the corner. And then I remove my pin.
For the photo, I used a "big" pin, for the purposes of demonstration only.
Of course I could buy a point turning tool, if only I could find one here. (and not pay 15$ in shipping costs)
Affichage des articles dont le libellé est how to. Afficher tous les articles
10/05/2014
14/12/2013
Unorthodox quilt finishing method - Lazy, and machine friendly.
Professional, dedicated, and serious quilters, please go away now.
I hate bias. And I don't like hand stitching much either.
Finishing a quilt with a hand stitched bias ? Nope. No, no. Do not insist, please.
So, if you don't care about traditional quilting, and think that, either way, your quilt will be loved (and warm) all the same, here's how I do it.
Considering your backing and batting have to be about 10cm (4") larger than your top, once your quilting is done, cut your batting at the same size as your top, and cut your backing about 2.5cm (1") larger than your top.
(see where I'm going ?)
Fold twice this edge over your top, and top-stitch. From the top point of view, it seems you have a bias finishing.
With this technique, you have to make sure your backing "suits" your top. No hiding a cheap/ugly backing.
I hate bias. And I don't like hand stitching much either.
Finishing a quilt with a hand stitched bias ? Nope. No, no. Do not insist, please.
So, if you don't care about traditional quilting, and think that, either way, your quilt will be loved (and warm) all the same, here's how I do it.
Considering your backing and batting have to be about 10cm (4") larger than your top, once your quilting is done, cut your batting at the same size as your top, and cut your backing about 2.5cm (1") larger than your top.
(see where I'm going ?)
Fold twice this edge over your top, and top-stitch. From the top point of view, it seems you have a bias finishing.
With this technique, you have to make sure your backing "suits" your top. No hiding a cheap/ugly backing.
13/02/2013
Finishing technique : facing with bias tape
I first used this technique for some armhole finishings on a sleeveless shirt a while back during training in a garment factory.
It's really easy and quick to do (hence used in the RTW process).
I also used it on a knit fabric, for a garment that didn't need stretch on the edges. (but I could have used a stretch bias tape)
It's really easy and quick to do (hence used in the RTW process).
What it looks like, on a garment. (you can see it on the left, on the peplums' edges)
I used a retail 4cm bias tape folded in 4. Ideally a self-fabric bias tape is better, because this kind of finishing requires to fold in 3, whereas retail bias is folded in 4.
As the folds of my bias are 1cm, I let a 1cm seam allowance. I put my bias on the edge on the right side and sew in the middle of the tape. Then I cut the external fold of my bias (you don't have to do this if you use self-fabric bias).
Turn your bias on the wrong side, press, and stitch at 1mm.
I choose to use this technique on this blouse because the fabric is a bit too light for large facings, as the pattern was initially designed, and also because it has rounded edges, and I didn't see myself hemstitching them. (nervously, I couldn't)
18/11/2012
Clipping or trimming ?
If you sew by the book, you know that when you have sewn a curve, you have to clip or trim it before turning it back.
Fot a collar, you trim, and every other time, you clip.
It's just that, over time, I've come to prefer trimming every time I meet a convex curve.
I'll show you why :
One side has been trimmed, and the other clipped. Obviously, the side looking better is the trimmed one.
Effective clipping requires to know how the fabrics will react, and to make relatively close notches (between 1cm / 3/8" and 1,5cm / 5/8") to avoid the effect seen above.
This fabric is an Armani suiting wool.
Fot a collar, you trim, and every other time, you clip.
It's just that, over time, I've come to prefer trimming every time I meet a convex curve.
I'll show you why :
Effective clipping requires to know how the fabrics will react, and to make relatively close notches (between 1cm / 3/8" and 1,5cm / 5/8") to avoid the effect seen above.
This fabric is an Armani suiting wool.
Here are the bottom of the overlap, on top, and the collar. The fabric is a linen-cotton blend.
The bottom has been clipped, and the collar trimmed. The clipping has been made a bit more carefully, but the "breakings" show a little nonetheless. It's not as noticeable because the fabric is fluider and it has been pressed cleverly.
Here are the bottom and top of the overlap, in a wool coating fabric. Both are trimmed.
Trimming seems a lazy solution, but I really like the outcome, and I also prefer it because I fear clipping might weaken the seam (probably irrational, but...).
Am I the only one trimming where clipping should be made ?
28/10/2012
Children Circus Tent vintage sewing tutorial
Here's a tutorial from a 50's Mode&Travaux Magazine from my grandmother's collection (she had a subscription in the 50's).
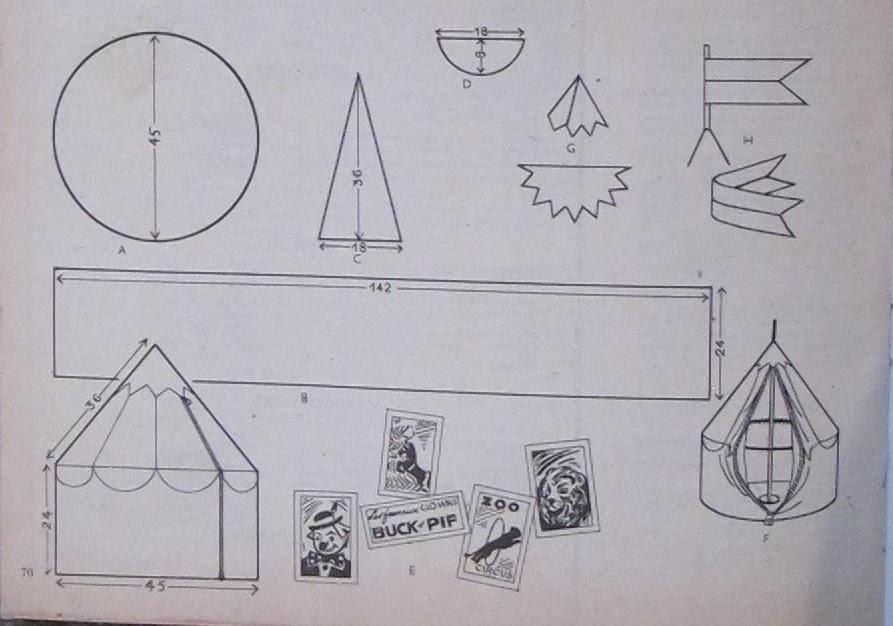
"The circus tent...
... will enchant children and parents alike, because it will permit to tidy up all the little toys lying around.
It's made of oilcloth in two or three colors (total meterage 1m20 x 1m50). Red and white, red and blue, green, red and white are cheerful combinations.
It's made of four parts :
- The bottom - A - is a circle
- The body - B - is a rectangle
- The marquee - C - is made of 8 triangles (in two colors)
- The canopy - D - is made of 8 scallops (in two colors)
The tent is reinforced by a disk of wood nailed to the bottom, and a sturdy pole screwed on this disk. This mount is simple to tinker, provided to give the disk to the carpenter to make it.
The assembly of the tent frame is made with a circle of wire (from the carcass of a lampshade for example), or wicker.
The tent opens with a 59cm zipper.
Trace the pattern with a chalk on the wrong side of the oilcholth, and cut, adding seams allowances.
On the "body" of the tent, "B", sew "posters", "E", from a contrasting color, and paint clowns or write fabulous programs. Let dry.
With a sewing machine, wrong side on wrong side, sew :
1- Bottom and body ; do not close ;
2- The 8 parts of the marquee, following the marking, let open ;
3- The canopy, put it on the "body" ;
4- Sew together marquee and body ;
5- Screw the pole on the wood disk, put in place, nail the bottom on this "carcass".
Overlock the wire inside the tent, where the body and the marquee are joined, "F". Close the "body", put the zipper on to close the tent. Set the top of the marquee around the pole with a few nails.
Sew a cone of oilcloth at the top to hide the finishings, "G". Make a banner in oilcloth (two-faced), and stick it at the top of the pole.
I tried to stay faithful to the original text, because I really love all those charming obsolete details (the carpenter !).
The tent is really small, but it can be made larger and become a real tent. (at first I thought it was, and was a bit disappointed when I read the measurements).
"The circus tent...
... will enchant children and parents alike, because it will permit to tidy up all the little toys lying around.
It's made of oilcloth in two or three colors (total meterage 1m20 x 1m50). Red and white, red and blue, green, red and white are cheerful combinations.
It's made of four parts :
- The bottom - A - is a circle
- The body - B - is a rectangle
- The marquee - C - is made of 8 triangles (in two colors)
- The canopy - D - is made of 8 scallops (in two colors)
The tent is reinforced by a disk of wood nailed to the bottom, and a sturdy pole screwed on this disk. This mount is simple to tinker, provided to give the disk to the carpenter to make it.
The assembly of the tent frame is made with a circle of wire (from the carcass of a lampshade for example), or wicker.
The tent opens with a 59cm zipper.
Trace the pattern with a chalk on the wrong side of the oilcholth, and cut, adding seams allowances.
On the "body" of the tent, "B", sew "posters", "E", from a contrasting color, and paint clowns or write fabulous programs. Let dry.
With a sewing machine, wrong side on wrong side, sew :
1- Bottom and body ; do not close ;
2- The 8 parts of the marquee, following the marking, let open ;
3- The canopy, put it on the "body" ;
4- Sew together marquee and body ;
5- Screw the pole on the wood disk, put in place, nail the bottom on this "carcass".
Overlock the wire inside the tent, where the body and the marquee are joined, "F". Close the "body", put the zipper on to close the tent. Set the top of the marquee around the pole with a few nails.
Sew a cone of oilcloth at the top to hide the finishings, "G". Make a banner in oilcloth (two-faced), and stick it at the top of the pole.
The tent is really small, but it can be made larger and become a real tent. (at first I thought it was, and was a bit disappointed when I read the measurements).
21/10/2012
Knit collar : Tips for lazy people
Lazy people ? Yep, that's me.
When I began sewing knit and jersey fabrics, I mostly wanted to do t-shirts, being tired of the tote-bag-like fitting and the dull colors I found in stores. Searching for the right ribbing for the collarband provedtoo complicated impossible. So I opted for self-fabric collar. (lazy #I)
I searched on the internet for the formula that would magically give me a perfect collarband. (lazy #II)
I found anything between 50% and 90%. I was not satisfied. I bought patterns. (lazy #III)
Looking at the patterns, I found that, often, the right proportion was around 90%.
Here's a demonstration on a modified Renfrew with a V collar. (I used only half of the garment) I want my collarband to be 1,5cm (3/8") large. The collar on the main piece is 36cm (14"1/16), and the edge of the collarband is 32cm (12"3/8), so the ratio is 89%. Logically, the larger the collarband, the smaller the ratio.
Depending on the fabric, I'll use a slightly smaller percentage if I want my collarband to stay flat (lightweight, or very stretchy fabrics for examples).
As you may have noticed on the first photo, I sew knits with my serger. So I had problems sewing the central part of the V neck collarband, as it's a zigzag. (btw, Kwik Sew tells me to sew a rectangle, and then, when I've attached the collarband to the bodice, to sew by hand the center part to make it flat... I love Kwik Sew, but no, just no).
For the same reason as above, I begin sewing my V neck at the center of the V ; this way I don't have to take any turn, and my V doesn't end up as a U. (lazy #V)
When I began sewing knit and jersey fabrics, I mostly wanted to do t-shirts, being tired of the tote-bag-like fitting and the dull colors I found in stores. Searching for the right ribbing for the collarband proved
I searched on the internet for the formula that would magically give me a perfect collarband. (lazy #II)
I found anything between 50% and 90%. I was not satisfied. I bought patterns. (lazy #III)
Looking at the patterns, I found that, often, the right proportion was around 90%.
Here's a demonstration on a modified Renfrew with a V collar. (I used only half of the garment) I want my collarband to be 1,5cm (3/8") large. The collar on the main piece is 36cm (14"1/16), and the edge of the collarband is 32cm (12"3/8), so the ratio is 89%. Logically, the larger the collarband, the smaller the ratio.
Depending on the fabric, I'll use a slightly smaller percentage if I want my collarband to stay flat (lightweight, or very stretchy fabrics for examples).
As you may have noticed on the first photo, I sew knits with my serger. So I had problems sewing the central part of the V neck collarband, as it's a zigzag. (btw, Kwik Sew tells me to sew a rectangle, and then, when I've attached the collarband to the bodice, to sew by hand the center part to make it flat... I love Kwik Sew, but no, just no).
So This is what I do : right side on right side, I then fold neetly in two and sew straight. (lazy #IV)
Then I "open" my collarband, and cut the small part standing out.
But I would not advise this for heavyweight fabric, as all the seam allowances end up on the same side.
For the same reason as above, I begin sewing my V neck at the center of the V ; this way I don't have to take any turn, and my V doesn't end up as a U. (lazy #V)
Inscription à :
Articles (Atom)