

Affichage des articles dont le libellé est tutorial. Afficher tous les articles
Affichage des articles dont le libellé est tutorial. Afficher tous les articles
03/05/2014
How to justify buying a coverlock - Ch.2 - Easy belt loops
Because fold in three, iron it, and put it in the coverlock.

14/12/2013
Unorthodox quilt finishing method - Lazy, and machine friendly.
Professional, dedicated, and serious quilters, please go away now.
I hate bias. And I don't like hand stitching much either.
Finishing a quilt with a hand stitched bias ? Nope. No, no. Do not insist, please.
So, if you don't care about traditional quilting, and think that, either way, your quilt will be loved (and warm) all the same, here's how I do it.
Considering your backing and batting have to be about 10cm (4") larger than your top, once your quilting is done, cut your batting at the same size as your top, and cut your backing about 2.5cm (1") larger than your top.
(see where I'm going ?)
Fold twice this edge over your top, and top-stitch. From the top point of view, it seems you have a bias finishing.
With this technique, you have to make sure your backing "suits" your top. No hiding a cheap/ugly backing.

I hate bias. And I don't like hand stitching much either.
Finishing a quilt with a hand stitched bias ? Nope. No, no. Do not insist, please.
So, if you don't care about traditional quilting, and think that, either way, your quilt will be loved (and warm) all the same, here's how I do it.
Considering your backing and batting have to be about 10cm (4") larger than your top, once your quilting is done, cut your batting at the same size as your top, and cut your backing about 2.5cm (1") larger than your top.
(see where I'm going ?)
Fold twice this edge over your top, and top-stitch. From the top point of view, it seems you have a bias finishing.
With this technique, you have to make sure your backing "suits" your top. No hiding a cheap/ugly backing.
28/09/2013
Easy needle/hook case tutorial - Straight sewing at its finest.

When I started knitting again, my mother felt really happy (relieved ?) to give me her needle collection. (authentic bent 70's needles, yay !) I saw this as a chance to stash-bust, and brainstorm an easy way to create a needle case.
(I'm sure it's nothing new, but I felt the need to share my great discovery).
The method (let's call it flat origami) requires just a single rectangle of fabric.
You determine the width of you needle case, and this will be the width of your rectangle.
The length of your rectangle will be calculated with the diagram below :

"a" is the part that'll be holding your needles/hooks.
"b" is the part where the needles/ hooks will be visible.
"c" is the flap.
So "d" is the important part : it's the length of your needles/hooks.
Once you've determined "a", "c" and "d", calculate 2a+2c+2d and you'll have the length of your rectangle.
("b" serves mostly in concordance with "a", to choose aesthetic proportions).
Add seam allowances on each side of your rectangle and cut.
Fold your rectangle as per the diagram, or the photos below.
Add a ribbon sandwiched in the layers. (if you forget, you can always sew it on later, like on my larger needle case).
Sew around, leaving an opening to turn your case inside out.
Once it's done (and the opening is closed), press, and sew vertical lines to make separations.
You can also fold the flap and make an edge stitch.
If you don't have enough fabric or want to twist it a bit, you can use two fabrics :

For my cable needles, I made a double row :

Once folded :

27/07/2013
Burda winter skirt (in summer) and easy edge stitch tips
There's not much to say about my Burda skirt, apart from the fact that this mini is a november pattern, and I had to lenghten it to make it seemly.
As a reminder, this is what you get when you google "germany winter" :

And this is the skirt -Burda Magazine 10/2011 #102- (in summer) :

The denim was quite pricey (16€/metre) and I had a "stingy moment", so I had to make do with just 0.80m (0.7y). (I couldn't fit everything, so the pockets are in a plain cotton).
So all this to talk a bit about what I do to make clean edge stitches -used a lot in jeans sewing-, while being lazy, stingy, and glamorous (always).
Most machines have an option to move the needle lateraly (yes, even the cheap ones). You can make the most of it in this situation. If you have a premium machine, you surely have the kind of foot shown at the bottom and don't need the tips.
Press your seam, move your needle to the far right (or left if you prefer), or to 1mm from the inside of your foot (if you can). Put your seam against the inside of your foot. Sew.

To make the additional seam, move your needle 5mm from the first seam (if your machine permit it). Repeat.

At school, I was taught to do the exact same thing on an industrial machine, with this type of foot (see below) -without moving the needle, as it's impossible-. Which is why RTW edge stitches are so narrow and precise. (to make the additional 5mm stitches, you just put the edge of your seam on/under the external side of the foot, half a foot being 5mm)

Or you can buy an edge stitching foot...
As a reminder, this is what you get when you google "germany winter" :

And this is the skirt -Burda Magazine 10/2011 #102- (in summer) :
The denim was quite pricey (16€/metre) and I had a "stingy moment", so I had to make do with just 0.80m (0.7y). (I couldn't fit everything, so the pockets are in a plain cotton).
So all this to talk a bit about what I do to make clean edge stitches -used a lot in jeans sewing-, while being lazy, stingy, and glamorous (always).
Most machines have an option to move the needle lateraly (yes, even the cheap ones). You can make the most of it in this situation. If you have a premium machine, you surely have the kind of foot shown at the bottom and don't need the tips.
Press your seam, move your needle to the far right (or left if you prefer), or to 1mm from the inside of your foot (if you can). Put your seam against the inside of your foot. Sew.
To make the additional seam, move your needle 5mm from the first seam (if your machine permit it). Repeat.
At school, I was taught to do the exact same thing on an industrial machine, with this type of foot (see below) -without moving the needle, as it's impossible-. Which is why RTW edge stitches are so narrow and precise. (to make the additional 5mm stitches, you just put the edge of your seam on/under the external side of the foot, half a foot being 5mm)
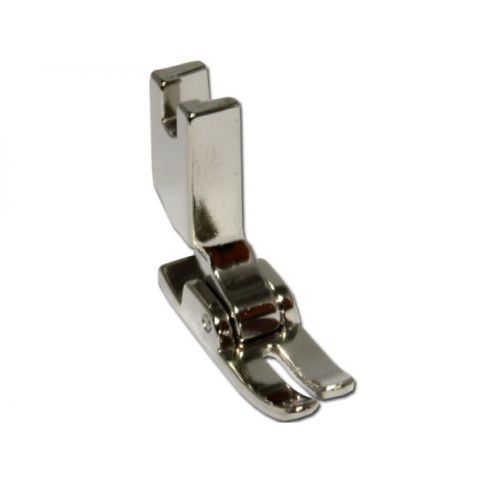
Or you can buy an edge stitching foot...
13/02/2013
Finishing technique : facing with bias tape
I first used this technique for some armhole finishings on a sleeveless shirt a while back during training in a garment factory.
It's really easy and quick to do (hence used in the RTW process).


I also used it on a knit fabric, for a garment that didn't need stretch on the edges. (but I could have used a stretch bias tape)

It's really easy and quick to do (hence used in the RTW process).

What it looks like, on a garment. (you can see it on the left, on the peplums' edges)
I used a retail 4cm bias tape folded in 4. Ideally a self-fabric bias tape is better, because this kind of finishing requires to fold in 3, whereas retail bias is folded in 4.

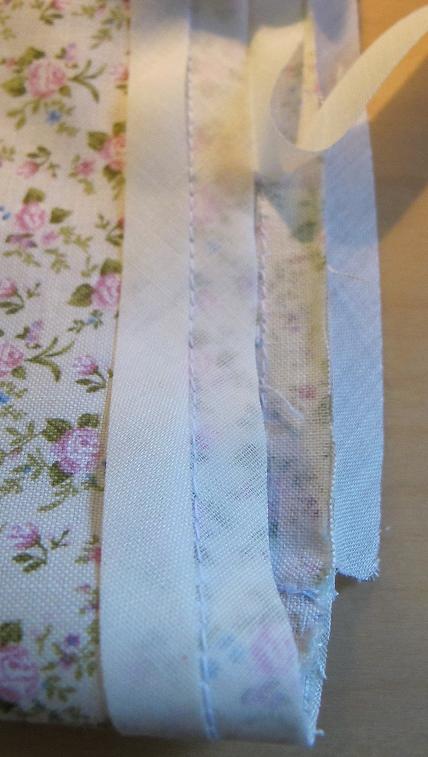
As the folds of my bias are 1cm, I let a 1cm seam allowance. I put my bias on the edge on the right side and sew in the middle of the tape. Then I cut the external fold of my bias (you don't have to do this if you use self-fabric bias).

Turn your bias on the wrong side, press, and stitch at 1mm.
I choose to use this technique on this blouse because the fabric is a bit too light for large facings, as the pattern was initially designed, and also because it has rounded edges, and I didn't see myself hemstitching them. (nervously, I couldn't)


12/12/2012
Vintage knitting pattern for cold knees
Once again, a pattern from a 50's Modes&Travaux. A knee-warmer ! (wonder why this trend didn't take...)
If you need a quick and strange christmas present, or if you go ice-skating, this might be a perfect stash buster.

Cold knee ... ingenious remedy.
Do not fear to admit your sensitivity to cold. Kneepads are not only for elderly ladies, but they're also a prudence pledge to misses and gentlemen.
You'll need : 100g of cabled wool, and needles #2 and #2 1/2. (metric)
The explanations are given for women. The framed numbers are for men.
Stitches used : Ribbing : knit, purl ; Stockinette : knit 1 row, purl 1 row.
Gauge : 20 st. = 5cm8 ; 20 rows = 4cm8.
Begin at top, cast on 110 st. [116] on #2 needles, and knit ribs for 3cm [4].
Take #2 1/2 needles, and knit in stockinette stitch.
X
Knit 86 [92] st., turn ;
Slip the first st., knit 61 [67], turn ;
Slip the first st., knit 73 [79], turn ;
Slip the first st., knit 85 [91], turn ;
Slip the first st., knit 97 [103], turn ;
Slip the first st. (it's the selvedge stitch), knit all, and take back to X.
Do this 11 [13] times in all.
Take your #2 needles back, and knit the ribs, make 8 decreases on the 62 st. in the middle. Knit the ribs for 4cm [5], and cast off without tightening.
If you need a quick and strange christmas present, or if you go ice-skating, this might be a perfect stash buster.

Cold knee ... ingenious remedy.
Do not fear to admit your sensitivity to cold. Kneepads are not only for elderly ladies, but they're also a prudence pledge to misses and gentlemen.
You'll need : 100g of cabled wool, and needles #2 and #2 1/2. (metric)
The explanations are given for women. The framed numbers are for men.
Stitches used : Ribbing : knit, purl ; Stockinette : knit 1 row, purl 1 row.
Gauge : 20 st. = 5cm8 ; 20 rows = 4cm8.
Begin at top, cast on 110 st. [116] on #2 needles, and knit ribs for 3cm [4].
Take #2 1/2 needles, and knit in stockinette stitch.
X
Knit 86 [92] st., turn ;
Slip the first st., knit 61 [67], turn ;
Slip the first st., knit 73 [79], turn ;
Slip the first st., knit 85 [91], turn ;
Slip the first st., knit 97 [103], turn ;
Slip the first st. (it's the selvedge stitch), knit all, and take back to X.
Do this 11 [13] times in all.
Take your #2 needles back, and knit the ribs, make 8 decreases on the 62 st. in the middle. Knit the ribs for 4cm [5], and cast off without tightening.
28/10/2012
Children Circus Tent vintage sewing tutorial
Here's a tutorial from a 50's Mode&Travaux Magazine from my grandmother's collection (she had a subscription in the 50's).

"The circus tent...
... will enchant children and parents alike, because it will permit to tidy up all the little toys lying around.
It's made of oilcloth in two or three colors (total meterage 1m20 x 1m50). Red and white, red and blue, green, red and white are cheerful combinations.
It's made of four parts :
- The bottom - A - is a circle
- The body - B - is a rectangle
- The marquee - C - is made of 8 triangles (in two colors)
- The canopy - D - is made of 8 scallops (in two colors)
The tent is reinforced by a disk of wood nailed to the bottom, and a sturdy pole screwed on this disk. This mount is simple to tinker, provided to give the disk to the carpenter to make it.
The assembly of the tent frame is made with a circle of wire (from the carcass of a lampshade for example), or wicker.
The tent opens with a 59cm zipper.
Trace the pattern with a chalk on the wrong side of the oilcholth, and cut, adding seams allowances.
On the "body" of the tent, "B", sew "posters", "E", from a contrasting color, and paint clowns or write fabulous programs. Let dry.
With a sewing machine, wrong side on wrong side, sew :
1- Bottom and body ; do not close ;
2- The 8 parts of the marquee, following the marking, let open ;
3- The canopy, put it on the "body" ;
4- Sew together marquee and body ;
5- Screw the pole on the wood disk, put in place, nail the bottom on this "carcass".
Overlock the wire inside the tent, where the body and the marquee are joined, "F". Close the "body", put the zipper on to close the tent. Set the top of the marquee around the pole with a few nails.
Sew a cone of oilcloth at the top to hide the finishings, "G". Make a banner in oilcloth (two-faced), and stick it at the top of the pole.

I tried to stay faithful to the original text, because I really love all those charming obsolete details (the carpenter !).
The tent is really small, but it can be made larger and become a real tent. (at first I thought it was, and was a bit disappointed when I read the measurements).

"The circus tent...
... will enchant children and parents alike, because it will permit to tidy up all the little toys lying around.
It's made of oilcloth in two or three colors (total meterage 1m20 x 1m50). Red and white, red and blue, green, red and white are cheerful combinations.
It's made of four parts :
- The bottom - A - is a circle
- The body - B - is a rectangle
- The marquee - C - is made of 8 triangles (in two colors)
- The canopy - D - is made of 8 scallops (in two colors)
The tent is reinforced by a disk of wood nailed to the bottom, and a sturdy pole screwed on this disk. This mount is simple to tinker, provided to give the disk to the carpenter to make it.
The assembly of the tent frame is made with a circle of wire (from the carcass of a lampshade for example), or wicker.
The tent opens with a 59cm zipper.
Trace the pattern with a chalk on the wrong side of the oilcholth, and cut, adding seams allowances.
On the "body" of the tent, "B", sew "posters", "E", from a contrasting color, and paint clowns or write fabulous programs. Let dry.
With a sewing machine, wrong side on wrong side, sew :
1- Bottom and body ; do not close ;
2- The 8 parts of the marquee, following the marking, let open ;
3- The canopy, put it on the "body" ;
4- Sew together marquee and body ;
5- Screw the pole on the wood disk, put in place, nail the bottom on this "carcass".
Overlock the wire inside the tent, where the body and the marquee are joined, "F". Close the "body", put the zipper on to close the tent. Set the top of the marquee around the pole with a few nails.
Sew a cone of oilcloth at the top to hide the finishings, "G". Make a banner in oilcloth (two-faced), and stick it at the top of the pole.
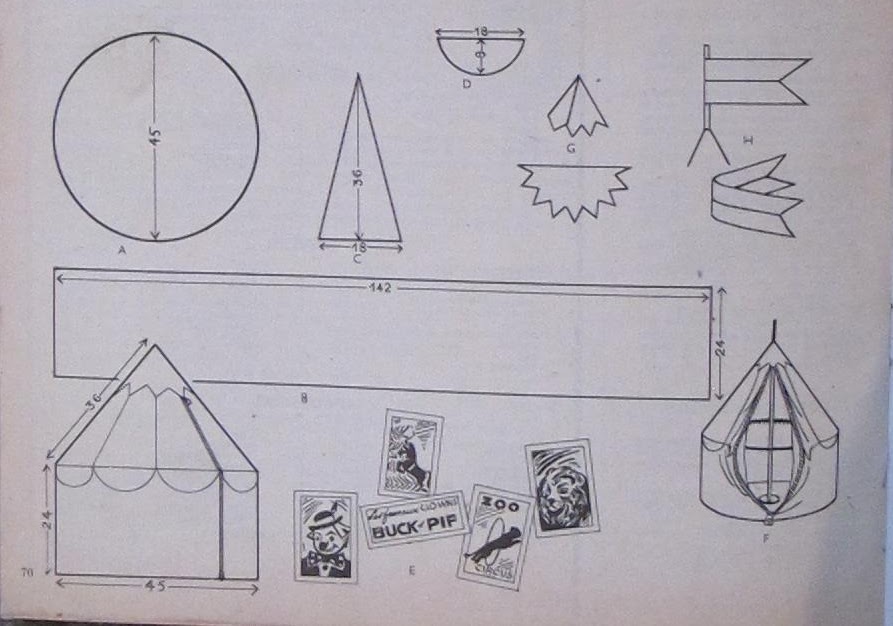
The tent is really small, but it can be made larger and become a real tent. (at first I thought it was, and was a bit disappointed when I read the measurements).
Inscription à :
Articles (Atom)